Word
Content
- Style sheet
- Printing in foreign currency
- Document variables
3.1 Overview of the document variables
3.2 Examples - Barcode
1. style sheet
What is a style sheet?
A style sheet defines standard font types, such as "Standard", "Headline", "Text", etc. This is done, for example, by the font, font size, color or character spacing. These types can then be accessed during creation to format the text. When Word is installed, a standard template (Normal.dot) is installed on each computer, which can be adapted to your taste. Whenever a Word document is created, this default template is assigned to the document.
Why does ClassiX® set its own format template when creating a Word document?
ClassiX® does this to achieve a uniform appearance of Word documents. Let us assume user A has defined a default font size of 12 on his computer and creates article descriptions. At the same time, however, article descriptions are also created by user B, who has locally defined a default font size of 8. If both article descriptions are printed out in one order, the font size changes permanently from 8 to 12 and vice versa. The printout therefore looks inconsistent.
When printing, however, a further problem arises, because when copying Word documents or their contents, only the text and the overdefined formats are transferred, but not the style sheet. Thus, texts can look completely different when printed than in the original, as the following example shows.
Example:
When copying a Word text, only the content and the additional formats are transferred. Thus, the font size and the addition "Bold" is also transferred to the document2, but the font of the copied section is now "Times New Roman".
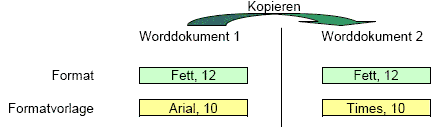
However, as long as both Word documents have the same style sheet, this problem does not occur.
How do I assign a style sheet to a document?
| oleObject - CX_WORD_DOCUMENT strDotPath - Path to the style | oleObject Call(GetApplication) -> applicationClip "CX_WORD_DOT" SystemObject Call(GetEnvironment) -> strDotPath |
| Installing the style sheet | strDotPath applicationClip Call(GetAddIns) Call(Add) Drop applicationClip Call(Lock) |
| A flag is set so that the Word document is automatically updated with the new style. | "-1" Integer oleObject Call(PutUpdateStylesOnOpen) |
| Assigning the new style template | strDotPath oleObject Call(PutAttachedTemplate) |
| The set flag is deactivated again and the path to the style is deleted. (see notes) | "0" Integer oleObject Call(PutUpdateStylesOnOpen) "" oleObject Call(PutAttachedTemplate) |
| The Word document is saved so that the changed formatting is not lost again. | oleObject Call(CX_Save) |
Hints for working with the style sheets
After a Word document has been assigned the style sheet, the path to the style sheet should be deleted and the option "Update styles automatically" should be disabled. The reason for this is that otherwise the format template will be accessed every time a Word document is opened. If the style template cannot be reached under the specified path, opening the document may take extremely long. (Up to 15 seconds if the path refers to a network directory. "//servername/classix/project name/system/classix.dot")
2. printing in foreign currency
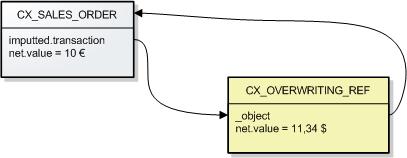
Printing in a foreign currency proceeds as follows. First, the document to be printed is wrapped and inserted on itself. The same happens with all its subitems. Before printing, the calculation is now started again, but not with the "correct object" but with the wrapper. So all values, which are now newly calculated in the foreign currency, are written into the wrapper. Since the wrapper is also placed in the PlugSpace during printing, the new values are accessed.
In the case of printing in a currency for which no currency table is registered, the table is created transiently and registered via the system object using AddOverwriteRate.
3.1 Overview of the document variables
3.2 Examples
Offer / order printing
(head)
| Information | Access printout | Comment | |
|---|---|---|---|
| Order number | uniqueID | ||
| Date | date | Creation date | |
| Administrator | Name: Phone: Fax: Email: | personInCharge.Speech(1,0,6) personInCharge.Access('CX_DESK_PHONE').uniqueID personInCharge.fax().uniqueID personInCharge.Access('CX_E_MAIL').uniqueID | Output as first name + surname |
| Address | Company name: contact person: Street: Land: POSTCODE: City: | call(Address Lake).Name(6) ordered.personInCharge.Speech(4,0,2) address.location() address.call(CountryText) address.zipCode address.city | |
| Subject Cover letter Footer text | header.mlComment or header.mlWordDoc main.mlComment or main.mlWordDoc footer.mlComment or footer.mlWordDoc | Depending on the type | |
| Delivery text | received.comment | ||
| RG - Note | invoiced.comment | ||
| Delivery date | delivered.spanDate | ||
| Invoice Date | invoiced.spanDate | ||
| Shipping date | shipped.spanDate | ||
| Net amount | net.value | ||
| Total | total.value |
(position)
| Information | Access printout | Comment | |
|---|---|---|---|
| Number | uniqueID UniqueID() | Number of the position Number of the position in the tree | |
| Short term (UK part) | salesItem.mlShortName | ||
| Description (UK part) | salemItem.mlDescription | ||
| Article text on the Pos. | salesItem.item.mlDescription or salesItem.item.mlWordDoc | Depending on the type of description. (The information is overwritten in the wrapper) | |
| Quantity | quantity | ||
| Base price | sales.pricePointer | ||
| Gross price | total.pricePer | ||
| Net price | netPrice | ||
| Net value | net.value | ||
| Delivery date | delivered.spanDate | ||
| Invoice Date | invoiced.spanDate | ||
| Shipping date | shipped.spanDate | ||
| Date of availability | dispatched.spanDate |
4. barcode
In ClassiX it is possible to have the UniqueID of Item printed as barcode on a label. By default, barcode type 39 is used and internally converted to mode 43. For this, however, the barcode font must be installed on the respective computer and the following options must be deactivated in Word:
- File -> Options -> Document check -> AutoCorrect options... -> tab "Autoformat during input" -> group "Replace during input" -> checkbox "*Bold* and _italic_ replaced by normal formatting" deactivate.
- File -> Options -> Document check -> AutoCorrect options... -> tab "Auto format" -> group "replace" -> deactivate checkbox "*Bold* and _italic_ by normal formatting".
This is necessary because barcode type 39 expects the character * to be the string Begins and Ends, and Word would, without these options, remove the character * and format the remaining digit string BOLD, which would result in the barcode not being read. A dot is always printed after a bar code and if the dot is not present, this is the first character that the bar code cannot be read. The dot has another function, because it marks the end of the line and is not formatted in the font of the bar code, because otherwise the control character at the end of a line would also be formatted and the bar code could no longer be read.
After printing a label with barcodes, it is recommended to check the barcode once for readability with a scanner before the label is processed further.
It must be ensured that the scanner works with the correct code page, otherwise the scanned barcodes will not be determined correctly.
;)
;)
;)
;)
;)
;)
;)
;)